BOD equipment and supplies
BOD Incubator
Thermostatically controlled at 20± 1°C. All light must be excluded to prevent photosynthesis during the 5-day incubation period.
Barometers
Digital Models
The laboratory temperature and barometric pressure must be recorded daily, particularly if the dissolved oxygen (DO) meter is calibrated using the water-saturated air or air-saturated water technique. NIST traceable electronic models are available that will monitor both temperature and barometric pressure. Use the pressure off of the DO meter.
Dial type models
Dial type NIST traceable barometers are satisfactory for monitoring barometric pressure. All barometers (electronic and dial type) should be checked to verify they are functioning properly. The internet or local airport can provide information that may be used to check laboratory barometers.
BOD Bottles
Standard glass bottles
Standard glass, 300 mL BOD bottles. Glass BOD bottles are most commonly used in a laboratory since they may be washed and reused.
Disposable bottles
Single-use, plastic disposable 300 mL BOD bottles. These bottles are acceptable for use providing they are only used once, and all quality control criteria are met.
Proper cleaning of BOD bottles
Use a good lab-grade non-phosphate detergent and bleach. Rinse thoroughly with tap water followed by distilled water. Allow to dry before storing. Always cover glassware and store in a clean, dry place.
Bleach-free alternate cleaning method
DO NOT MIX hydrochloric acid (HCl) and bleach: It will produce poisonous chlorine gas!
Some folks prefer not to use bleach at all in cleaning their BOD labware, as even traces of bleach can kill "bugs" critical to the BOD test. Use a good laboratory grade non-phosphate detergent. Rinse thoroughly with tap water followed diluted hydrochloric acid (HCl) [10 percent solution; 100 mL hydrochloric acid (HCl) per liter of water]. Rinse again with tap water followed by distilled water. Allow to dry before storing. Always cover glassware and store in a clean, dry place.
Dilution water containers
- Store dilution water in all glass containers only. Any hard plastic will break down over time and leach BOD.
- If dilution water is siphoned into BOD bottles from the container, only Teflon® or glass should be immersed in the water.
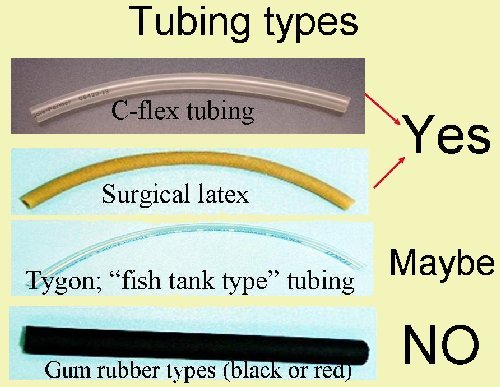
- Use only C-flex® and latex rubber tubing to dispense the dilution water into BOD bottles.
- Bottom draw, aspirator bottles can also work well. Polypropylene bottles do, however, present a risk. As bottles are cleaned with bleach or acid, the plastic breaks down, posing a risk for leaching of BOD material. Glass bottles with glass aspirators are always preferable.
- For greatest safety, wrap large glass carboys with reinforced tape. This will minimize generation of dangerous glass shards if the bottle breaks.
Saturating BOD dilution water with oxygen
As a general rule, NEVER put "fish tank" tubing or air stones directly in contact with dilution water. These items can leach oxygen-demanding materials. Air stones can harbor bacteria which--unaccounted for--can cause excess DO depletion and subsequent high bias.
Saturating dilution water with oxygen can be source of contamination in BOD testing. Water can be aerated by lightly covering the opening of the glass storage container with link free tissue, cotton or foam rubber.
Avoid using material that will slough-off into the dilution water. If a laboratory uses compressed air to aerate the dilution water, use an in-line filter (as shown) to prevent dust and oil from getting into the water. In-line filters are available from most scientific specialty companies.
Tubing types
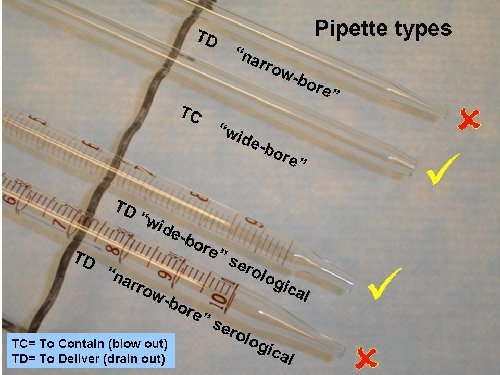
Pipet types
Certified thermometers
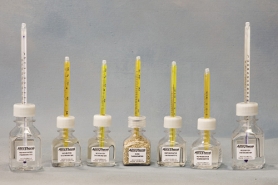
A factory (or NIST) certified thermometer must be placed in the incubator to verify the temperature is maintained within the 20± 1°C tolerance each day during the 5-day incubation period (including weekends). These may also be used to demonstrate that the temperature of sample refrigerators and autosamplers is maintained at temperatures not to exceed 6°C (and samples cannot be frozen). Total immersion type incubator thermometers or electronic thermometers are satisfactory. Always record the temperature in a logbook or bench record.
Smaller NIST traceable thermometers work well for documenting incubator temperatures. Rather than re-calibrating, these are usually replaced annually.
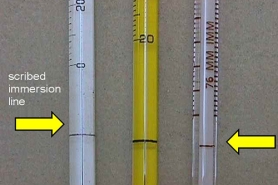
A partial immersion thermometer is needed to confirm the samples are in the 20± 3°C range prior to preparing the BOD dilutions. Be wary of the immersion line scribed on these thermometers.
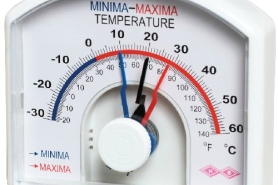
NIST traceable minimum/maximum or electronic recording thermometer are adequate for checking the temperature on weekends.
DO meter and DO probe
A dissolved oxygen (DO)meter and probe are critical items needed for the BOD testing.
Most new newer DO meters have a built-in barometers, thermometer and on-board software to simplify the calibration process.
While polarographic type DO probes used to be the most common style in use, they are quickly being outpaced by the newer, more rugged electro-optical (LDO, RDO) probes.
Oxygen Measurement Techniques
DO Probe
Electrochemical method:
Composed of two metal electrodes in contact with supporting electrolyte and separated from the test solution by a gas permeable membrane. A constant voltage is placed across the cathode and anode. Oxygen diffuses through the membrane and is reduced at the cathode by the voltage. This process produces a current flow, which is detected by the meter and is proportional to the partial pressure of oxygen. Since oxygen is "consumed" the sample needs to be stirred to ensure accurate readings.
Luminescence method:
A fluorescent film is applied to the tip of a probe. The fluorescence is sensitive to the presence of oxygen. Changes in fluorescence activity are proportional to the concentration of oxygen in the sample. This technology has been used for years in the medical field. Those little fingertip oxygen sensors use the same technology. Other than greater stability and longer probe membrane life, one key advantage with "electro-optical" probes is that oxygen is not consumed.
Polarographic Probes: Single VS. Dual Thermistor
Added thermistor to electrolyte (in addition to sample sensor). This allows temperature measurement in sample (water or air) AND in electrolyte. Air is poor heat sink (think of cooking in a copper vs. aluminum pot). People have tendency to calibrate too quickly when doing AIR calibrations. Double thermistor monitors differential between air and electrolyte and does not lock in calibration until the two are equal in temperature. Bottom Line: provides for more accurate & consistent calibrations.
Luminescence DO Technology
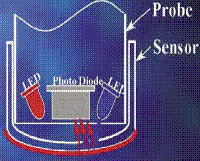
Luminescence technology I: Initially Blue light from an LED inside the probe excites luminescent material on the sensor surface.
Image courtesy of HACH, Inc.
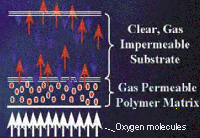
Coming into vogue around 2005, luminescence represented a whole new technology for environmental chemistry, but which had been in use in medical field for many years. Blue light is transmitted to the probe sensor from an LED on the surface. This blue light excites the luminescent material which in turn emits red light as it encounters oxygen and is returned to its unexcited state. As oxygen molecules encounter the sensor surface, they react with the luminescent material, causing it to return to its un-excited state. This results in emission of red light which is correlated to oxygen content.
Probes utilize a sensor coated with luminescent material. Blue light is transmitted to the sensor from an LED on the surface. This blue light excites the luminescent material which in turn emits red light as it returns to its unexcited state. The elapsed time from excitation till return to steady state is measured. The more oxygen present, the shorter the time it takes for red light emission. Time is measured and correlated to oxygen concentration.
Features of Luminescence DO Probe
LDO 2: The reaction of oxygen molecules with the luminescent material produces a red light proportional to the oxygen concentration.
Developed by the HACH company. Probe uses NO:
- anode (nothing to polish)
- cathode
- electrolyte
- membrane
All of the items listed above are potential sources of error in conventional DO technology. Research shows luminescence requires:
- Less frequent adjustments during calibration
- Less maintenance
Disadvantages of luminescence probe:
- Early model required an awkward funnel and magnetic stirrer.
- The funnel was difficult to use and posed a cross-contamination risk.
Luminescence Technology is Approved for Wastewater Compliance Testing
YES! Changes to ch. NR 219, Wis,. Admin. Code, which took effect June 1, 2009, included approved methodologies for Luminescence technology. Please note that other manufacturers offer this same technology under a different name (e.g., RDO or Rugged Dissolved Oxygen). The name may be different, but the technology itself, "electro-optical" or luminescence, is still approved.
DO Probe Maintenance
Electrolyte replenishment Membrane failure Membrane rupture Membrane fouling Cathode and anode cleaning Follow manufacturer recommendations for interval and procedure
Troubleshooting DO Probe Problems
YSI 5100 On-board Tools for Monitoring Membrane Problems
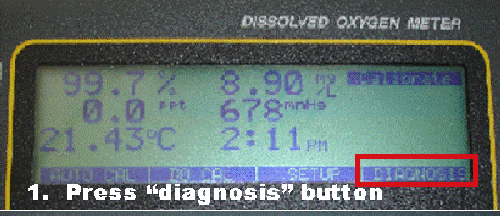
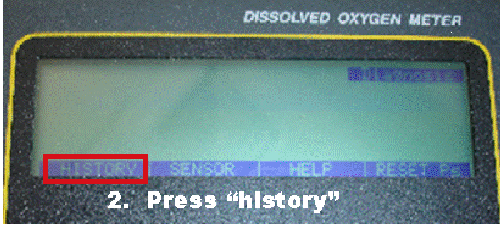
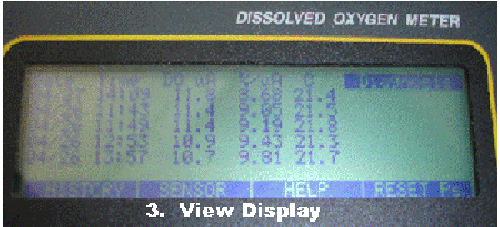
DO µA (micro-amps) should be from 8.0 to 17.0 %/ µA (micro-amps) should be from 5.9 to 12.6 percent Replace membrane if outside this range Good tool for preventative maintenance
YSI on-board tools for probe maintenance. Step 2 - Press History.
YSI on-board tools for probe maintenance. Step 3 - The display will now show probe values for microamps(µA) and microAmp percentage (µA%).
General Probe (non-LDO) Maintenance
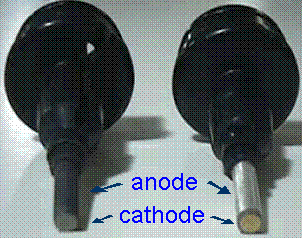
A probe in poor condition (left) vs. a probe in good condition (right). Note the light silver appearance of the anode and the gold matte finish of the cathode on the right.
Examine membrane daily. Replace membrane if air bubbles, wrinkles, or if there is buildup on or under the membrane. If gold tip (cathode) is tarnished, clean it.
- The gold should have a bright "matte" finish with fine scratches-DO NOT polish too much!
- Clean with sanding disk provided in the YSI cap.
The silver anode should have a light silver color. Clean if anode is dark. Clean by soaking overnight in household ammonia solution. Rinse thoroughly with tap water, DI water and electrolyte.
Troubleshooting DO Probe Calibration Problems
Poor calibration may give the appearance of a dilution water problem when the water may be fine. Recommend calibrating using the air-saturated WATER calibration or Winkler titration. If air-saturated water calibration is used, use a good quality barometer in the laboratory. Check the barometer calibration against a reliable source at least quarterly (internet, airport, local station). Remember you must re-correct for actual altitude.
Troubleshooting Probe Membranes
Allow ≥ 2 hr after membrane change for the probe to stabilize. Overnight is better. Warm-up instrument. Calibrate. Observe readings continuously for 2 mins. w/probe in bottle. Be sure the temperature is constant. Watch the readings carefully. Do NOT just record the initial reading and come back 2 minutes later. You need to actually see what happens over the time period.
- If readings drifts slowly DOWN, a longer warm up time is required.
- If readings JUMP AROUND, the probe is not functioning properly.
- If readings STABLE in the air calibration bottle, sensor is probably OK.
- If readings stable in the air calibration bottle but not in solution, the membrane is probably defective.
pH meter and pH paper
A pH meter is one way to verify the sample pH is in 6.5-8.0 range prior to testing for BOD.
Short range pH paper is an acceptable option as well. pH paper may not be used to measure pH for permit purposes, however.
Other supplies for BOD testing
- Nutrient buffer solutions — commercially available
- Sulfuric acid [H2SO4] solution (1N) for adjusting sample pH — available commercially
- Sodium hydroxide [NaOH] solution (1N) for adjusting sample pH — available commercially
- Glucose-glutamic acid (GGA) solution — available commercially
- Nitrification inhibitor (if carbonaceous BOD is desired or allowed in the facility's NPDES permit) — available commercially
- Standard laboratory glassware
- Bleach for sanitizing BOD bottles, dilution water storage containers and tubing used to dispense dilution water
- Hydrochloric acid [HCl] solution (10% of concentration) for adjusting pH or removing scale from BOD bottles


